Basic Photography Tips 1
Basic Operations
This is the first course in the Basic Photography Tips series. By the end of the article, you'll know how to work a camera manually, and you'll be able to tell how each of the three basic controls affects the photograph – a great start to becoming creative with your photography.
Note: To start with, don't be afraid of your camera! It's safe to press any button you want. At worst, you'll screw up some pictures. At best, you'll create an amazing piece of art that will change people's lives for generations!
Most cameras seem complicated at first, but there are really only three essential controls that will affect the look and feel of your photographs:
![]() Aperture: A hole that light passes through on its way through the lens. The photographer controls the size of this hole.
Aperture: A hole that light passes through on its way through the lens. The photographer controls the size of this hole.
![]() Shutter Speed: The amount of time that the sensor (or film) is exposed to light from the lens. The photographer controls this time.
Shutter Speed: The amount of time that the sensor (or film) is exposed to light from the lens. The photographer controls this time.
![]() Focus: The distance at which the lens makes the subject appear sharp and clear. The photographer controls this distance.
Focus: The distance at which the lens makes the subject appear sharp and clear. The photographer controls this distance.
Almost all the buttons and dials on your camera are designed to control just these three things! Modern cameras have automatic controls, which can be faster and easier than doing it all yourself. However, no camera can tell how you want the photograph to look – learning how to work everything manually will let you be more creative! For this tutorial, set your camera's picture mode to "M" (manual).
Aperture: Half of "Exposure"
The term "Aperture" actually refers to the size of the aperture (an adjustable hole that light passes through on its way through the lens). The photographer can change the size of the aperture with controls on the camera body, or with a ring at the base of the lens (on older cameras).

Apertures are sometimes called "f-stops", and are usually written with a script "f" in front. Watch out – small numbers mean big apertures, and big numbers mean small apertures! (For instance, f2.8 is bigger than f16.) Each number in the series is considered to be 1 "stop" different than the last, allowing 1/2 as much light into the camera.
Some lenses "stop down" to different apertures than others. Zoom lenses usually have a lower aperture range than "prime" (non-zoom) lenses. Low magnification lenses usually include bigger aperture settings, and high magnification lenses usually include smaller ones.
Aperture Fact #1
The smaller you make the aperture, the less light can come through the lens. You may have to balance a small aperture setting with a slower shutter speed to allow the right amount of light into the camera, and vice versa. (More on this later!)
Aperture Fact #2
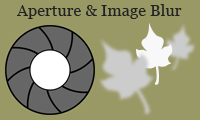
A smaller aperture will make the front and back leaves clearer; a larger one will make them blurrier
Regardless of where you focus the lens, more of the photograph will appear sharp and clear if you use a smaller aperture. To see this for yourself, make a pin-hole in a piece of paper and look through it. Focus your eye on something far away and hold a finger out in front of you. Keep your eye focused, and take the paper away. Notice how much blurrier your finger looks without the narrow hole! This is why controlling the aperture size is important – you can choose to make the whole picture sharp and clear, or to make most of it blurry and have only your focus point stand out.
Artistic Note: Experiment with different aperture settings for the same situation. There is no "correct" setting – it all depends on how you want the photograph to look. Try stopping down all the way for one picture, then opening the aperture up wide for the next. Try all the settings for a variety of photographs, and think about which you like best!
Shutter Speed: The Other Half of "Exposure"
The "Shutter Speed" is the length of time that the shutter (a tiny metal curtain) clicks open, allowing light from the lens into the camera. The photographer can change the shutter speed with a control on the camera body.

Shutter Speeds are given in seconds – usually in fractions of seconds. The bigger the number, the slower the shutter speed. There are other shutter speeds too – from 1/8000s to many hours! Each number in the series is considered to be 1 "stop" different than the last, allowing 1/2 as much light into the camera. For example, 1/125s is two stops slower than 1/500s.
Usually, only expensive camera bodies have shutter speeds from 1/4000s to 1/8000s. Newer, computerized cameras will have shutter speeds from 30s to 1/2000s. Older manual cameras range more from 1s to 1/500s. For shutter speeds longer than 30s, you'll have to lock the shutter open and time it yourself.
Cameras will usually just show you the bottom part of the shutter speed number: for example, 1/15s will be shown as 15. When the numbers get bigger than a second, they'll add a quotation mark: for example, 1s will be shown as 1".
Shutter Speed Fact #1
The faster you make the shutter speed, the less light can come through the shutter. You may have to balance a faster shutter speed with a wider aperture opening to let the right amount of light into the camera, and vice versa. (More on this later!)
Shutter Speed Fact #2
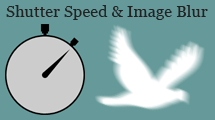
A faster shutter speed will make the bird clearer; a slower one will make it even blurrier
Fast shutter speeds "freeze" action, while slow shutter speeds show action as a blur. For example, if you were to photograph a person riding a bicycle with a shutter speed of 1/250s, the rider in the photograph would appear to be almost motionless. If you took the same photograph with a shutter speed of 1/15s, the rider would appear as a streak across the photograph. 1/8000s is fast enough to freeze the motion of an airplane prop! 2s (with the camera steady on a tripod) is long enough to make flowing water look smooth and silky.
Artistic Note: As with aperture settings, different shutter speeds can make the same scene look very different! Subject movement (or even camera movement) can produce pleasing blurs with a slow shutter speed. A fast shutter speed can render a fast-moving object completely motionless. Experiment with different shutter speeds and find out what you prefer for a variety of moving subjects!
Exposure: Aperture and Shutter Speed Combined
When you take a photograph with your camera, two important things happen: the aperture snaps down to your chosen size, and the shutter clicks open for exactly as long as you told it to. All in the blink of an eye! Both the aperture and shutter speed limit the light that comes into the camera. The combination of the two is what's called an "exposure": exposing the digital sensor (or film) to just the right amount of light to make the photograph appear not too light and not too dark.
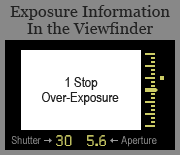
Exposure is shown by the dot's position on the exposure scale
Most cameras have built-in "light meters" that suggest appropriate exposures based on the brightness of the scene. Exposures values are measured in stops (like apertures and shutter speeds) relative to the suggested exposure. By reading your light meter (look through the viewfinder) you can tell if the photograph you're about to make will be too bright (+), too dark (-), or just right. You can then make adjustments to the aperture or shutter speed if you want to.
You can get the same exposure by using different aperture and shutter speed combinations. If you want the same results, you'll have to speed up or slow down the shutter speed by the same number of stops you widen or narrow the aperture by (and vice versa). Remember the effects that different apertures and shutter speeds will produce!
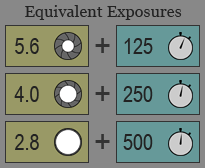 For example, all three of these aperture / shutter speed combinations produce the same final exposure. There are lots of other combinations too – you're only limited by the range of your camera and lens! Try finding the suggested exposure for a certain subject through your camera's viewfinder. Change either the shutter speed or the aperture, then think about how to adjust the other to bring the exposure back to where you started.
Exposure Fact #1
Your camera's light meter will change its suggested exposure based on the ISO setting of your digital sensor (or film). The ISO setting changes the sensor's sensitivity to light, and is commonly set to 100, 200, 400, 800, or 1600. As usual, each higher ISO is one stop "faster" than the last, and requires half as much light to obtain the same exposure. For example, if your camera's light meter suggested "1/60s at f8" for ISO 100, it might suggest "1/125s at f8", or "1/60s at f11" for ISO 200.
Exposure Fact #2
Your camera's light meter will suggest an exposure that makes your photograph "18% gray" – the optimum exposure to show the most detail. If you want the photograph to look brighter or darker, you'll have to change either the shutter speed or aperture. For example, if you were taking a photograph of a bright white picket fence, you might have to overexpose (brighten) the photograph. You can do this either by slowing down the shutter speed or opening up the aperture, probably by about 1 or 2 stops.
Artistic Note: "Correct" exposure is not determined scientifically! Only your personal preferences and artistic talents can tell you whether a photograph might look better lighter, darker, or somewhere in the middle. Experiment with different exposures for every photograph. Don't let anyone tell you that your exposure is wrong if you're happy with how it looks.
Focus: Controlling Sharpness
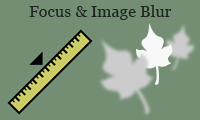
Focusing nearer will sharpen the close leaf and blur the distant one; focusing further will do the opposite
This is the easy part! The focus control sets the distance at which objects will appear sharp and clear in the final photograph. Setting the focus changes tiny distances between elements inside the lens, altering the way light passes through it. Focus isn't measured in stops like other camera controls – it's just a distance, in either feet or metres.
The focus on most newer lenses can be set using a ring on the lens barrel. A switch on the lens or the camera body sets the camera to "autofocus" (it finds the focus point automatically) or to "manual focus" (you find the focus point yourself). Focusing isn't complicated, but it can be important to do it carefully. The focusing ranges of particular lenses vary, but most can focus from about 0.5m to infinity.
You'll be able to easily tell where your lens is focused – everything at that distance will appear sharp and clear in your camera's viewfinder. Some modern cameras also have "focus confirmation", a small light that flashes on in the viewfinder when correct focus is achieved, even when manually focusing.
Artistic Note: It can be easier and faster to use the autofocus systems found on most modern cameras, but practice focusing manually as well. Some situations can fool autofocus systems, making them "search" for focus. Most importantly, the camera can't tell what part of the photograph is most important to you! Try focusing creatively. Colours and patterns can look quite interesting when photographed out-of-focus. Changing only the focus can sometimes create many completely different looking photographs!
